In my previous post, I showed you how to get up and running with ASP.NET Blazor web development. In this post, I will show you how to use th...

Here in the Northern Hemisphere, we are rapidly approaching the Winter Solstice, also known as the shortest day of the year. Yet sunshine is crucial to human wellbeing. Want to know how to find out when the sun rises and set in your location? We can build a Blazor application that shows the Day/Night Terminator, which is a shadow graphic laid on top of a map that shows exactly where the line is between day and night for any given date and time. Let’s build a simple Day/Night Terminator web application with Asp.NET Core Blazor and GeoBlazor!
Get the Full Source Code on GitHub
Getting Started
First, make sure you have the .NET 7 SDK installed on your computer. Now, open up a command prompt (Cmd, Bash, PowerShell, Windows Terminal), navigate to where you like to store code, and type
dotnet
    new
    blazorwasm-empty -o SolarTracker
. This will create a new empty Blazor WebAssembly (wasm) project named SolarTracker inside a folder of the same name. Navigate into the folder with cd SolarTracker, and type dotnet run to see your Hello World.Add GeoBlazor, the Blazor GIS Mapping Library
Hit
Ctrl-C to stop your application, then type dotnet
add package
dymaptic.GeoBlazor.Core. This will import the free and Open-Source GeoBlazor package into your project. To complete this quest, you will also need to sign up for a free ArcGIS Developer account at https://developers.arcgis.com/sign-up/. Once you create this account, head to https://developers.arcgis.com/api-keys/, and click New API Key. Give it a title like Solar
Tracker, and copy down the generated token. Now it’s time to fire up your favorite IDE and open your SolarTracker project. Inside, create a new file called appsettings.json inside the wwwroot folder. If you’re familiar with Asp.NET Core, you know this is a configuration file. However, by default Blazor WASM doesn’t include this file. Paste your ArcGIS API key into the file with the key "ArcGISApiKey".{
"ArcGISApiKey": "PASTE_YOUR_KEY_HERE"
}Let’s add some references to make GeoBlazor work. In
wwwroot/index.html, add the following three lines to the head tag. (The third line should already be there, just un-comment it).<link href="_content/dymaptic.GeoBlazor.Core"/>
<link href="_content/dymaptic.GeoBlazor.Core/assets/esri/themes/light/main.css" rel="stylesheet" />
<link href="SolarTracker.styles.css" rel="stylesheet" />Next, open up
_Imports.razor, and let’s add some @using statements to make sure we have access to the GeoBlazor types.@using dymaptic.GeoBlazor.Core.Components
@using dymaptic.GeoBlazor.Core.Components.Geometries
@using dymaptic.GeoBlazor.Core.Components.Layers
@using dymaptic.GeoBlazor.Core.Components.Popups
@using dymaptic.GeoBlazor.Core.Components.Symbols
@using dymaptic.GeoBlazor.Core.Components.Views
@using dymaptic.GeoBlazor.Core.Components.Widgets
@using dymaptic.GeoBlazor.Core.Model
@using dymaptic.GeoBlazor.Core.ObjectsFinally, open
Program.cs and add the following line to import the GeoBlazor Services.builder.Services.AddGeoBlazor(builder.Configuration);Add a Map to your Blazor Page
Now to see the reason for all these imports! Let’s open Pages/Imports.razor. Delete the Hello World and add the following.
<MapView Style="height: 600px; width: 100%;" Zoom="1.5">
    <Map>
        <Basemap>
            <BasemapStyle Name="BasemapStyleName.ArcgisStreets" />
        </Basemap>         <GraphicsLayer />
    </Map>
    <LocateWidget Position="OverlayPosition.TopLeft" />
    <SearchWidget Position="OverlayPosition.TopRight" />
</MapView>
Run your application again and you should see a world map!
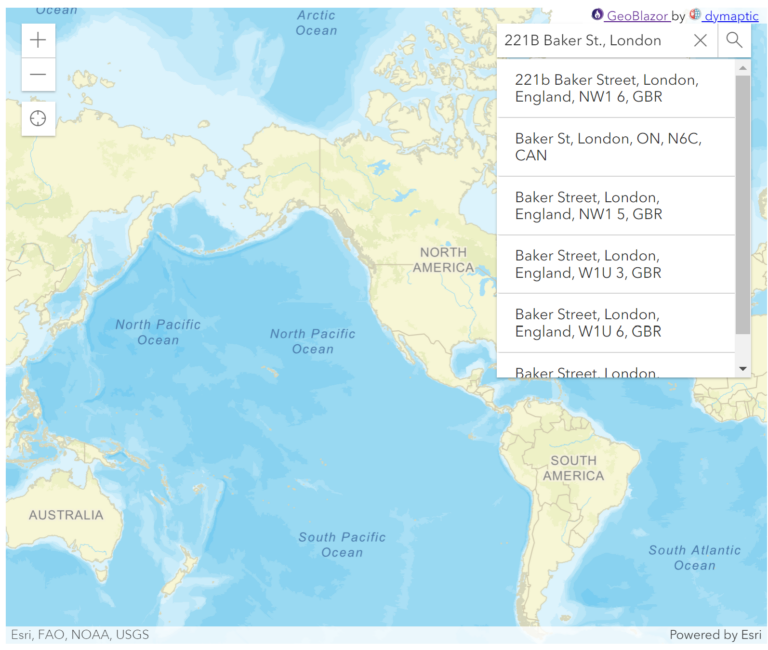
Go ahead and play around with the
Locate and Search widgets. Notice that when using either one, there will be a nice dot added to the map to show the location of your device or the search result.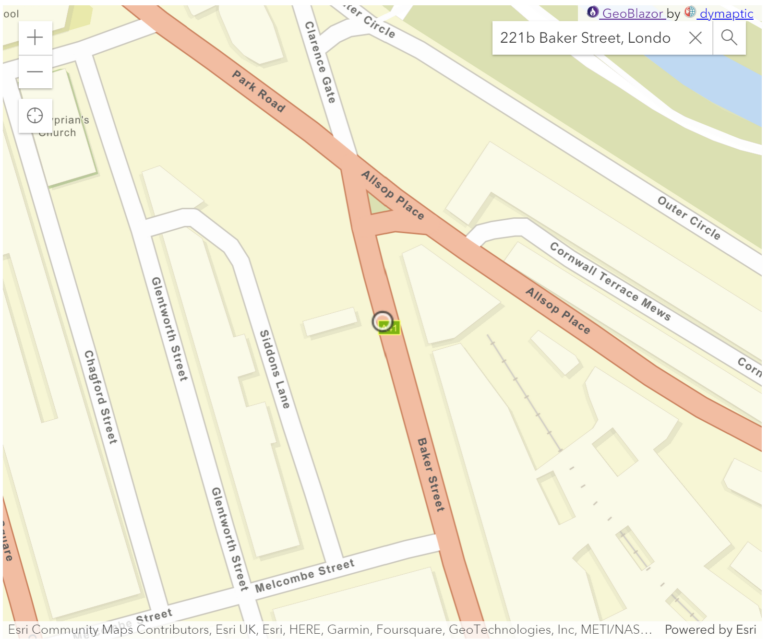
Calculate and Draw the Day / Night Terminator
We want to create an interactive graphic that shows where the line is between day and night, so we can figure out when the sun will rise and set. Add the following methods inside a
@code { } block at the bottom of your Index.razor Blazor page. private async Task OnViewRendered()
{
// generate the night-time shadow graphic, and store it in _terminus
if (!_terminusAdded)
{
await CreateTerminator();
_terminusAdded = true;
_terminus = new Graphic(_polygon!,
new SimpleFillSymbol(new Outline(new MapColor(0, 0, 0, 0)),
new MapColor(0, 0, 0, 0.3), FillStyle.Solid));
await _graphicsLayer!.Add(_terminus);
await JsRuntime.InvokeVoidAsync("removeLoadingCursor");
}
}
private MapView? _mapView;
private GraphicsLayer? _graphicsLayer;
private Polygon? _polygon;
private Graphic? _terminus;
private bool _terminusAdded;We also need to hook up
MapView and GraphicsLayer to the reference fields and the OnViewRendered EventCallback, and add some @inject references at the top of the file.@page "/"
@inject Projection Projection
@inject GeometryEngine GeometryEngine
@inject IJSRuntime JsRuntime
<MapView @ref="_mapView" OnViewRendered="OnViewRendered" ...>
<Map>
...
<GraphicsLayer @ref="_graphicsLayer" />
</Map>
...The next bit I borrowed logic heavily from midnight-commander by Jim Blaney, who in turn used Declination on Wikipedia to build the calculations. Add the following two methods to the
@code block. protected override async Task OnInitializedAsync()
{
CalculateDeclinations();
await FetchTimeZoneData();
}
private void CalculateDeclinations()
{
for (int i = 1; i < 366; i++)
{
double solarDeclination = -57.295779 *
Math.Asin(0.397788 *
Math.Cos(0.017203 *
(i + 10) + 0.052465 *
Math.Sin(0.017203 * (i - 2))));
_declinationPerDay[i] = solarDeclination;
}
}
private async Task FetchTimeZoneData()
{
try
{
var client = new HttpClient();
HttpResponseMessage result = await client.GetAsync(TimeZoneServiceUrl);
TimeZoneData data = (await result.Content.ReadFromJsonAsync<TimeZoneData>())!;
_timeZoneData.AddRange(data.Features);
}
catch (Exception ex)
{
Console.WriteLine(ex.ToString());
}
_timeZonesLoaded = true;
}
private async Task CreateTerminator()
{
// code adapted from https://github.com/jgravois/midnight-commander/blob/master/js/SolarTerminator.js
int ordinalDay = _selectedDateTime.DayOfYear;
double solarDeclination = _declinationPerDay[ordinalDay];
double yMax = 85;
double latitude = yMax * (solarDeclination > 0 ? -1 : 1);
List<MapPath> rings = new();
DateTime utcDateTime = _selectedDateTime.Subtract(_timeZoneOffset);
double lt = utcDateTime.Hour + utcDateTime.Minute / 60.0 + utcDateTime.Second / 3600.0;
double tau = 15 * (lt - 12);
for (double lon = -180; lon < 180; lon++)
{
MapPath path = new(new(lon + 1, latitude),
new(lon, latitude),
new(lon,
GetLatitude(lon, solarDeclination, -yMax, yMax, tau)),
new(lon + 1, GetLatitude(lon, solarDeclination, -yMax, yMax, tau)),
new(lon + 1, latitude));
rings.Add(path);
}
_polygon = new Polygon(rings.ToArray(), SpatialReference.Wgs84);
_polygon = (Polygon)(await Projection.Project(_polygon, SpatialReference.WebMercator))!;
}
private double GetLatitude(double longitude, double solarDeclination, double yMin, double yMax, double tau)
{
longitude += tau;
double tanLat = -Math.Cos(longitude * K) / Math.Tan(solarDeclination * K);
double arctanLat = Math.Atan(tanLat) / K;
return Math.Max(Math.Min(arctanLat, yMax), yMin);
}
private DateTime _selectedDateTime = DateTime.Now;
private bool _timeZonesLoaded;
private TimeSpan _timeZoneOffset = TimeSpan.Zero;
private TimeZoneInfo? _timeZoneInfo;
private readonly List<TimeZone> _timeZoneData = [];
private readonly IReadOnlyList<TimeZoneInfo> _timeZoneInfos = TimeZoneInfo.GetSystemTimeZones();
private const double K = Math.PI / 180;
private readonly Dictionary<int, double> _declinationPerDay = [];
private const string TimeZoneServiceUrl =
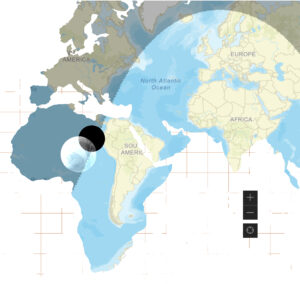
"https://services.arcgis.com/P3ePLMYs2RVChkJx/arcgis/rest/services/World_Time_Zones/FeatureServer/0//query?where=1%3D1&outFields=*&f=json";Running your application now should show the Day/Night Terminator laid on top of the map.
Control The Date and Time
Let’s give our application some controls and a header. Right after the
@inject line at the top, add the following.{
<h1>Day/Night Terminator</h1>
<div>
<label>
Date:
<input type="date"
value="@_selectedDateTime.ToString("yyyy-MM-dd")"
@onchange="UpdateDate" />
</label>
<label>
Time:
<input style="width: 96px;"
type="time"
value="@_selectedDateTime.ToString("HH:mm")"
@onchange="UpdateTime" />
</label>
</div>
}In the @code block, add these new methods.
private async Task UpdateDate(ChangeEventArgs arg)
{
string[]? dateSegments = arg.Value?.ToString()?.Split('-');
if (dateSegments is null || dateSegments.Length != 3) return;
int year = int.Parse(dateSegments[0]);
int month = int.Parse(dateSegments[1]);
int day = int.Parse(dateSegments[2]);
_selectedDateTime = new DateTime(year, month, day,
_selectedDateTime.Hour,
_selectedDateTime.Minute, 0);
_terminusAdded = false;
await OnViewRendered();
}
private async Task UpdateTime(ChangeEventArgs arg)
{
string[]? timeSegments = arg.Value?.ToString()?.Split(':');
if (timeSegments is null || timeSegments.Length < 2) return;
int hour = int.Parse(timeSegments[0]);
int minutes = int.Parse(timeSegments[1]);
_selectedDateTime = new DateTime(_selectedDateTime.Year,
_selectedDateTime.Month,
_selectedDateTime.Day, hour, minutes, 0);
_terminusAdded = false;
await OnViewRendered();
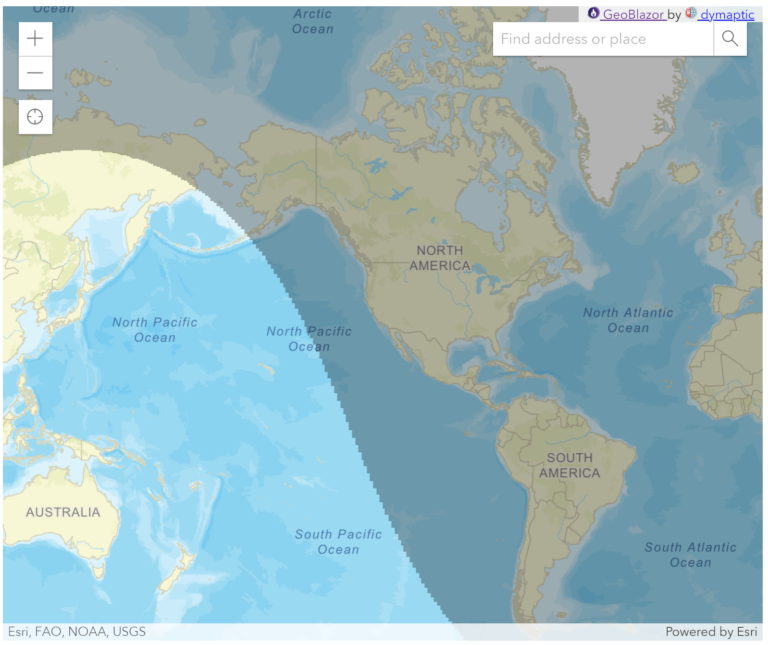
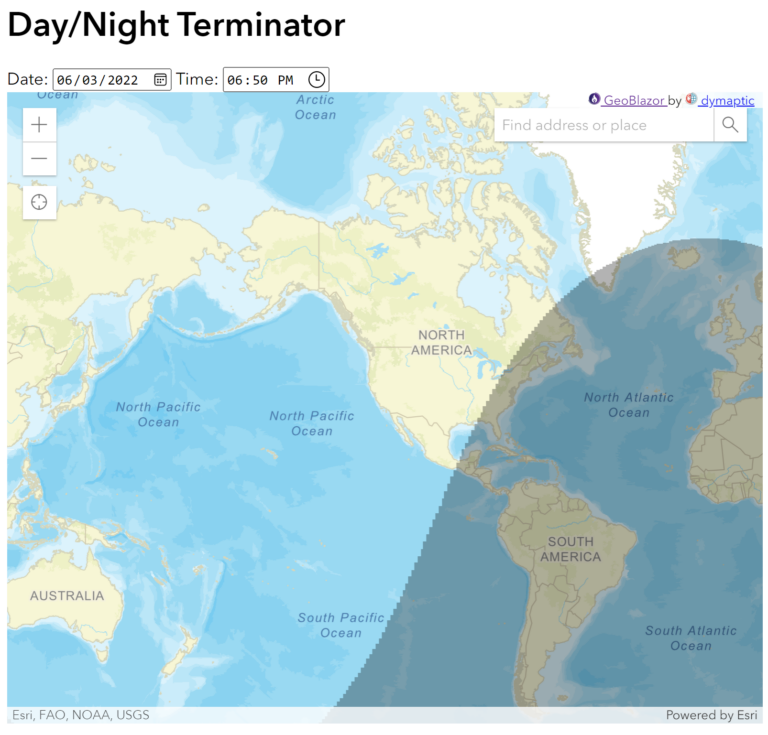
}Run the application, and you will be able to control the terminator graphic by changing the date/time. Try switching to a summer month and notice the drastically different shadow.
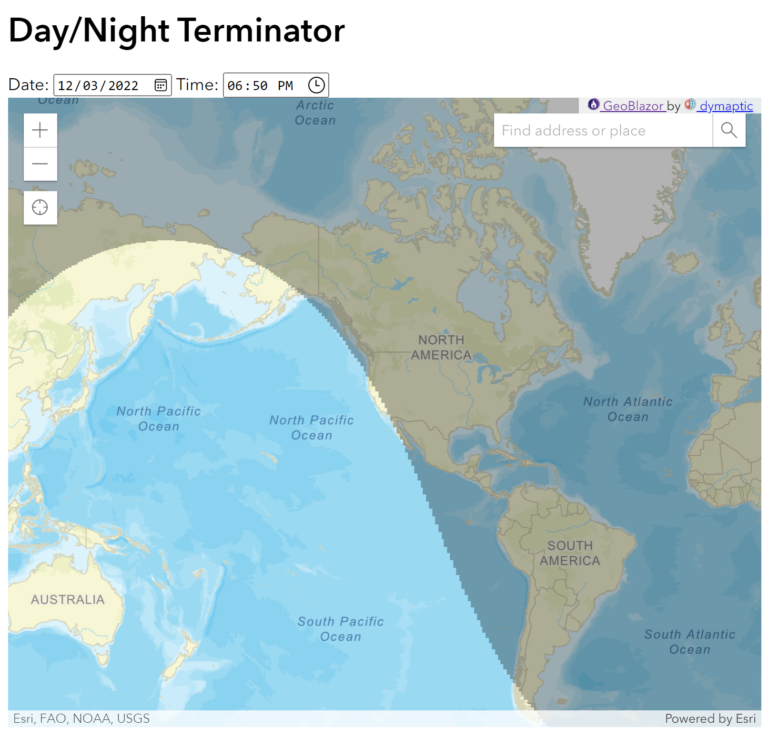
You can now put in the date and time for any day you want, and the application will show you where the terminator sits. To find sunrise or sunset at your location, use the
Locate or Search widget, then use the up/down arrow keys in the Time field to watch the shadow move, until the line is just on top of your point. Now you have a fun, interactive tool to track the sun, so don’t forget to go out and soak in some rays while you can! A more full-featured version of this tool, including animation to find the next sunrise or sunset for any location, is online at advent2022.GeoBlazor.com and the code can be found on GitHub. You can get in touch with me at tim.purdum@dymaptic.com, at TimPurdum@Fosstodon.org (Mastodon) or Join our Discord server. Ask dymaptic how we can help you with software or GIS. I hope you enjoyed the post and continue to enjoy the winter holiday season!
Check Out GeoBlazor
With GeoBlazor, you have access to the world’s most powerful and versatile web mapping API, the ArcGIS JavaScript API, but without having to write a single line of JavaScript.
Let's Go Mapping!Related articles


In my previous post, I showed how to call the ArcGIS JavaScript API using the IJSRuntime from Asp.NET Blazor. Today, I’m happy to announce a...

The graphical internet is nearly 3 decades old (Mosaic was released in 1993). For most of that time, JavaScript has been the standard for we...